

Table of Contents
Introduction
Moss on your roof can be more than just an eyesore; it can lead to significant damage and costly repairs if it’s not addressed in time. While it might seem harmless at first glance, moss can weaken your roof and compromise its integrity over time. Whether you’re dealing with a light layer of green or a full-blown infestation, the good news is that moss can be controlled, removed, and prevented with the right approach.
This comprehensive guide will walk you through everything you need to know about moss removal—from understanding why it happens, to spotting the signs, to exploring effective methods of getting rid of it. Whether you’re considering tackling it yourself or hiring professionals, we’ll help you decide what’s best for your roof’s health and your peace of mind.
By the end, you’ll have a clear step-by-step strategy, along with insights into professional moss removal services for when you need an expert hand. After all, a well-maintained roof protects not just your home but your investment in it.
1. Understanding Moss Growth on Roofs
Before jumping into solutions, it’s essential to understand why moss grows on roofs in the first place. This knowledge can help you take smart preventative steps to keep your roof moss-free in the future.
What Causes Moss to Grow?
Moss thrives in specific conditions, and roofs often create the perfect environment for its growth. Here are the primary factors:
- Shade: Roofs shaded by overhanging trees or located in areas with minimal sunlight are prone to moss. It loves low-light environments and can spread quickly in shaded spots.
- Moisture: Dampness is a major contributor. Moss holds onto moisture, and roofs that experience limited airflow or consistent rainfall provide the damp environment moss needs to survive.
- Roof Material: Certain roofing materials, like asphalt shingles and wood shakes, tend to trap debris like leaves and dirt. This can provide moss with a substrate to anchor and grow.
When these factors combine, you may find green patches slowly creeping across your roof. Left unchecked, this growth can escalate into a problem that isn’t just aesthetic but structural.
Why is Moss a Problem?
At first, moss might seem harmless. But over time, it can cause several issues that make proper management essential:
- Roof Damage: Moss holds moisture against the surface of your roof, leading to rot, decay, and even leaks. This is especially dangerous during freezing temperatures when the water can expand and cause significant damage.
- Reduced Lifespan: Moss buildup shortens the lifespan of your roofing materials, whether they’re asphalt shingles, wood shingles, or another type. It can lift shingles, causing them to crack or separate.
- Aesthetic Value: Thick moss layers can make your home appear neglected, affecting curb appeal and potentially lowering your property value.
Addressing moss early is essential to avoiding costly repairs and maintaining the longevity of your roof.
2. Signs of Moss Infestation
Moss growth doesn’t happen overnight. Recognizing the signs early can save you from more extensive repairs down the road. Knowing what to look for and how to assess the situation is crucial.
Identifying Moss on Your Roof
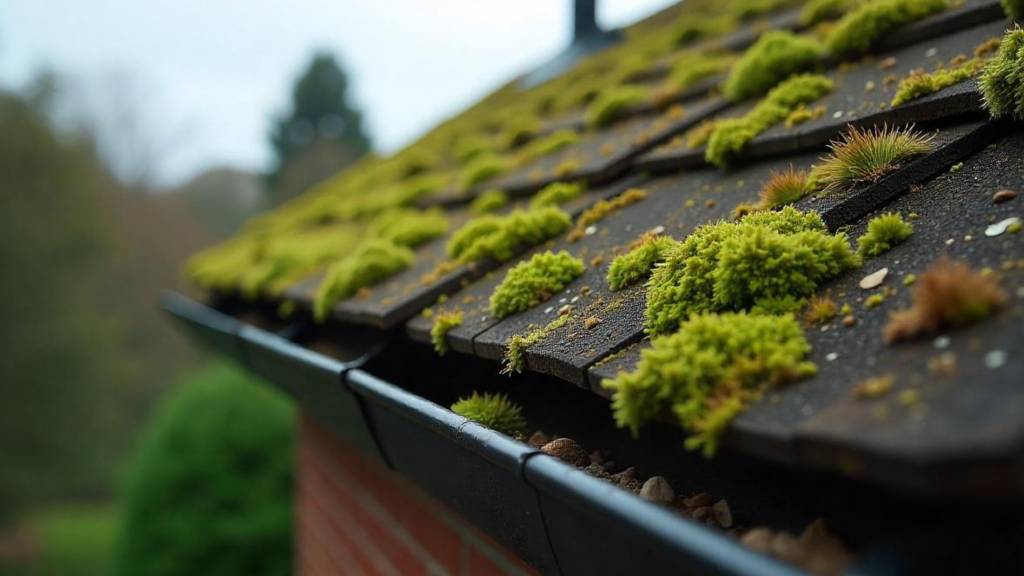
Even small patches of moss are a sign that your roof could become vulnerable if no action is taken. Here are some key indicators:
- Visual Clues: Look for green or dark brown clumps on shaded sections of your roof. These clumps might range from thin, flat growth to thick, fuzzy pillows of moss.
- Discoloration: Shingles with moss may also show signs of discoloration, appearing darker in affected areas.
- Clogged Gutters and Downspouts: Moss fragments often break off and collect in your gutters, impacting drainage. If you notice unusual debris buildup, it could be a sign of moss spreading on your roof.
Assessing the Severity of the Problem
Even if you spot moss, the extent of its growth can vary, and not every case requires immediate professional involvement. Here’s how to evaluate the situation:
- Surface-Level Growth: If you notice thin patches of moss limited to shaded areas, you might be able to manage the removal with a simple DIY method.
- Thick Clumps: If moss is growing in layers or has spread across large portions of your roof, this may indicate a more severe problem. Thick growth is harder to remove and increases the risk of roof damage, so professional intervention may be worth considering.
- Structural Impact: Check the condition of your shingles underneath. If moss has begun to lift or crack shingles, it’s a strong indicator of damage that will require expert repair.
While monitoring and DIY options can be effective, it’s important to know your limits. Heavily infested roofs often require specialized tools and expertise to ensure the moss is removed safely and effectively.
3. DIY Methods for Removing Moss
If you’ve decided to tackle moss removal on your own, there are several effective do-it-yourself methods you can try. These approaches not only save money but also help you better understand your roof’s condition. However, safety is crucial during this process, so always proceed carefully and use proper equipment.
Manual Removal Techniques
Manually removing moss is simple but requires some physical effort and the right tools. Here’s what you need and how to do it safely:
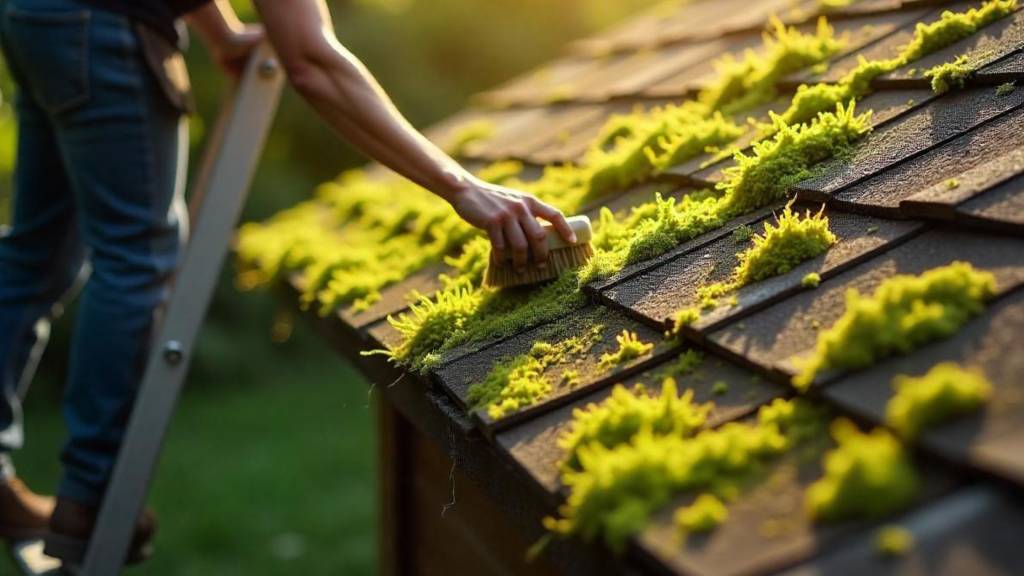
Tools You’ll Need
- A sturdy ladder
- Safety gear, such as a harness, gloves, and rubber-soled shoes for grip
- A stiff-bristle brush (never use wire brushes as they can damage shingles)
- Tarp or drop cloth to catch debris
Step-by-Step Instructions
- Set Up Safely: Start by setting up your ladder securely on level ground. If possible, have someone hold the base for added stability. Safety should always be your first priority.
- Brush Off the Moss: From a secure position on the ladder or roof, gently scrub away the moss using the stiff-bristle brush. Work from the top of the roof downward to prevent loosening or damaging shingles. Avoid aggressive scrubbing.
- Dispose of Debris: Use a tarp or drop cloth to collect moss as you remove it. This prevents it from falling into your gutters or lawn.
- Inspect Your Work: Once you’ve brushed off the moss, inspect the roof for any signs of loosened shingles or hidden damage.
Manual removal works for small patches of moss or early-stage infestations. For larger areas or stubborn moss, consider additional methods.
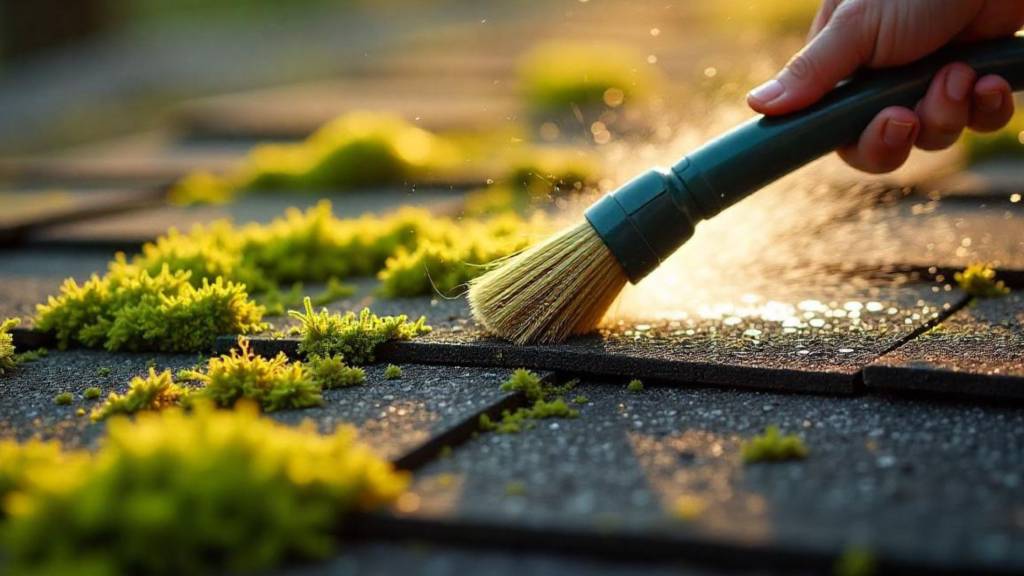
Chemical Solutions
For more persistent moss, chemical solutions can speed up the removal process and kill the moss at its root. These can range from commercial moss removers to homemade mixes created with common household items.
Commercial Moss Killers
Many home improvement stores sell products specifically designed to eliminate moss. These are typically applied using a sprayer. Follow the manufacturer’s instructions carefully for the best results.
Homemade Solutions
- Vinegar Solution: Mix equal parts vinegar and water in a spray bottle and apply it to mossy areas. Allow the solution to sit for an hour before scrubbing or rinsing.
- Bleach Solution: Combine one part bleach with four parts water. Apply safely to kill moss, but take care to avoid contact with plants or other vulnerable surfaces.
Safety Precautions
- Avoid applying chemicals during heavy sunlight or rain, which can cause runoff and ineffective results.
- Protect surrounding vegetation by covering nearby plants with a tarp before spraying.
While chemical solutions are effective, they should be used cautiously. If you’re unsure about the process, consulting a professional may be the safer option.
Pressure Washing
Pressure washing can quickly remove moss but should be approached with care to avoid damaging your roof.
Pros and Cons
- Pros: Fast and effective for large areas and tough moss.
- Cons: High-pressure settings can loosen or damage shingles, especially if used improperly.
Tips for Safe Pressure Washing
- Use a low-pressure setting designed for roofs.
- Hold the nozzle at a downward angle and never spray upward, as this can force water under your shingles.
- Keep a consistent distance to avoid stripping asphalt granules from shingles.
Pressure washing is best suited for durable roofing materials and severe infestations. If you’re unsure about using this method, professionals possess the know-how to pressure wash effectively without potential damage.
4. How to Remove Moss from Roof Shingles
Roof shingles can be particularly delicate, requiring careful moss removal methods to ensure their longevity. Here are some targeted techniques for common shingle types:
Removing Moss from Asphalt Shingles
- Soft Brushing: Use a soft-bristle brush to gently remove moss. Avoid scrubbing or pressure that could damage the granules protecting your shingles.
- Low-Impact Spray: Employ a garden hose with light water pressure to rinse off moss after applying a cleaning solution.
Removing Moss from Cedar Shake Shingles
- Hand Removal: Cedar shake is more rugged but still benefits from gentle hand removal using brushes.
- Moss Treatment Products: Make sure any chemical solutions used are deemed safe for wood materials.
Shingles are often a long-term investment, so take extra care while cleaning. If you notice persistent moss or damage, it’s wise to enlist professional services. Pros not only remove moss safely but also provide roofing inspections to ensure everything remains in optimal condition.
5. Natural Methods for Moss Removal
If you prefer eco-friendly and non-chemical approaches, natural methods can be just as effective. These techniques are safer for your roofing material, surrounding greenery, and the environment.
Solutions Using Common Household Ingredients
- Vinegar: Besides being a chemical cleaner, vinegar is biodegradable and less aggressive. Use a spray bottle filled with white vinegar mixed with water for application.
- Baking Soda: Sprinkle baking soda directly onto mossy areas and leave it for a few hours. The alkalinity will create an environment where moss can’t survive.
- Liquid Dish Soap: A simple mix of one teaspoon of dish soap diluted in water can be sprayed on moss. After letting it sit, scrub it away gently.
These natural methods often work best for smaller buildups or areas you want to maintain on an ongoing basis.
Benefits of Natural Moss Removal
- Won’t harm surrounding plants or soil.
- Prevents exposure to harsh chemicals.
- A budget-friendly and accessible alternative.
Natural methods may take slightly longer to show results but are ideal for homeowners who want to prioritize safety and reduce environmental impact.
Consider Professional Help for Larger Infestations
While natural solutions are perfect for mild moss infestations, larger or more stubborn cases may require advanced techniques that only professionals can offer. Professionals know how to address extensive moss growth without risking your roof’s health, using commercial-grade tools and eco-safe methods.
6. Preventative Measures to Keep Moss at Bay
While removing moss is essential, preventing it from returning is even better. With the right care and maintenance routine, you can significantly reduce the chances of moss taking over your roof again. Here are some strategies to keep your roof moss-free.
Roof Maintenance Tips
- Regular Inspections: Make it a habit to inspect your roof at least twice a year, ideally in spring and fall. Look for moss, debris accumulation, or signs that moisture is being trapped on the surface.
- Keep the Roof Clean: Clear leaves, twigs, and other debris from the roof surface and gutters. Debris can trap moisture and create the perfect breeding ground for moss.
- Trim Overhanging Branches: Trees that provide excessive shade encourage moss growth. Trim back branches to allow sunlight and airflow to reach the roof. This will dry out the surface faster, making it less hospitable to moss.
- Ensure Proper Drainage: Clogged gutters or blocked downspouts can cause water to pool on the roof. Regularly cleaning or repairing drainage systems prevents this issue.
Installing Zinc or Copper Strips
Metal strips, like zinc or copper, are an incredibly effective long-term solution for moss prevention. These metals naturally release particles when it rains, which inhibit moss from growing.
How to Install:
- Attach zinc or copper strips under the uppermost layer of shingles along the ridge of your roof.
- Position them so the metal partially sticks out, allowing rainwater to wash particles across the roof.
Benefits:
- Provides a passive, chemical-free method of moss control.
- A single installation lasts for years, making it a low-maintenance solution.
If you’re unsure about handling metal strip installation yourself, professionals can handle the job efficiently and ensure proper placement.
Choose the Right Roofing Materials
Certain roof materials like metal or composite shingles are less likely to attract moss growth compared to asphalt or wood shingles. If you’re upgrading your roof, consider materials that minimize moisture retention and maintenance.
Preventing moss may require effort upfront, but the benefits of a clean, long-lasting roof make it worth the investment.
7. When to Call in the Professionals
While DIY methods and maintenance can work for mild moss problems, there are situations where hiring a professional is the key to protecting your roof. Here’s why professional services might be your best solution.
Benefits of Hiring Experienced Roofing Services
- Safety First: Climbing a roof to remove moss can be risky, especially without proper equipment. Professionals have the right tools and training to handle the job safely.
- Efficiency and Expertise: Roofing experts not only remove moss but also evaluate your roof for damage, leaks, or underlying issues that you might miss.
- Access to Effective Tools: Professionals use commercial-grade equipment and solutions tailored to your roofing material, ensuring moss is removed without damaging shingles or tiles.
- Time-Saving: DIY roof cleaning can take hours or even days, depending on the extent of the moss growth. Professionals streamline the process, saving you time and hassle.
What to Expect from Professional Services
When you hire a professional to remove moss, here’s what you can anticipate:
- An initial inspection to assess the severity of the moss and overall roof condition.
- Detailed removal methods, whether manual cleaning, eco-friendly chemical application, or low-pressure washing.
- Recommendations for preventative measures, such as installing copper or zinc strips or scheduling routine inspections.
If you’re looking for expert help, America’s General Contracting offers full-service roof maintenance, moss removal, and gutter solutions. With professionals on your side, you can rest assured that your roof will stay clean and strong for years to come.
8. Cost Considerations
The cost of moss removal varies based on whether you opt for DIY methods or hire professional services. Understanding these expenses can help you make an informed decision.
Costs for DIY Moss Removal
- Tools and Equipment: Buying a ladder, safety gear, and brushes can range from $50 to $200.
- Chemical Solutions: Commercial moss killers or ingredients for homemade solutions may cost between $10 and $50.
- Time Investment: While DIY may save money, the time and effort required to remove moss yourself can be significant.
If the problem is small, DIY removal can be a budget-friendly option.
Costs for Professional Services
- Moss Removal: Hiring a professional usually costs between $300 and $700, depending on the size of the roof and the severity of moss growth.
- Additional Services: If your roof needs repairs or preventative installations like zinc strips, expect costs to rise. These services could add $100–$300 to the final bill.
Factors Affecting Cost
- Roof Size: Larger roofs require more time and resources to clean.
- Severity: Dense, widespread moss takes longer to remove, increasing labor costs.
- Accessibility: Roofs that are steep or difficult to access may incur higher fees due to safety precautions and specialized equipment.
Investing in professional services may feel like a larger upfront expense, but it could save you money in the long run by avoiding structural damage and extending your roof’s lifespan.
9. Conclusion
Moss on your roof isn’t just a cosmetic issue; it’s a problem that can lead to significant damage and costly repairs if ignored. Whether you’re dealing with light patches or a heavier infestation, understanding how to address and prevent moss is key to preserving your roof’s health.
Key Takeaways
- Learn why moss grows and recognize early warning signs of infestation.
- Explore DIY, natural, and professional methods to effectively remove moss.
- Adopt preventative strategies like regular maintenance, trimming branches, and installing zinc or copper strips to keep your roof clear.
While DIY solutions can work for minor problems, tackling dense moss or ensuring long-term prevention often requires professional expertise. Hiring trained roofing specialists like those at America’s General Contracting ensures safety, efficiency, and peace of mind.
Your roof is your home’s first line of defense. Take proactive steps to protect it, and don’t hesitate to reach out to experts when the job demands it. A small investment today can save you from costly repairs tomorrow!
